The Cost of Maintaining and Repairing a Chimney in 2026
While most people don’t pay much attention to their chimney, it is an important structure of your house. Maintaining both the interior and exterior of your chimney is very important.
Often, homeowners forget that without a well-maintained chimney, their fireplace has no value. It is important to repair your chimney, as soon as you notice a problem with it.
Faulty chimneys can cause several problems, including compromising your safety, and as mentioned before, ruining the purpose of your fireplace. It’s great to react once a situation occurs, but it is even better to prevent it in the first place. By keeping your chimney in good shape from the start, you can avoid repair expenses down the road, and could also save your life!
A rule of thumb is that every year, you should have your chimney inspected. Even with annual inspections, it’s important to take proper care of your chimney all year-round. Being able to notice problems with your chimney can save you money in the long run and help your chimney last longer.
It will be easier to identify problems if you have significant knowledge about chimney parts. We will provide an overview of these parts to help you.
Chimney Exterior
While the exterior of your chimney may look nice, appearance is not its sole purpose. Your chimney’s exterior has many important parts that help keep your chimney safe, and your fireplace functional.
Bricks
Besides being the facade of your chimney, bricks are used to reinforce your chimney’s stability and improve the performance of your fireplace. There is a risk of water entering your chimney through cracks if your bricks are damaged. This can harm your chimney as this water can freeze and thaw as the temperature changes, causing even more damage to your chimney bricks. This will cause spalling.
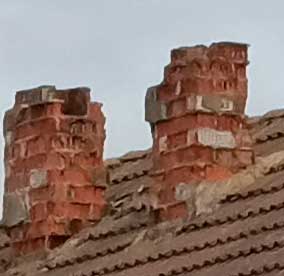
When the mortar between bricks deteriorates, this is called spalling. When spalling occurs, your bricks will crack, chip, and fall out of place. Prolonged spalling can result in the brick facade becoming weak, and your chimney will quickly lose its stability.
Chimney Crown
The chimney crown is another part of your chimney, and it is often confused for the cap. The slab of concrete covering the side of your chimney’s opening is known as the chimney crown. The purpose of this part of your chimney is to create a separator between the top of your chimney and the exterior elements.
Chimney Cap
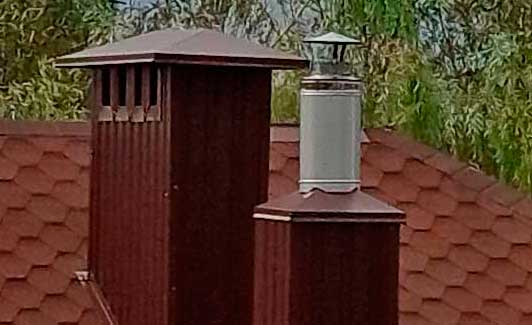
A protective shield, known as the chimney cap sits on top of your chimney, to avoid allowing animals, as well as rain, snow, and debris from entering your chimney. This cap also plays an even more important role. Your chimney cap will prevent your roof from catching on fire as a result of hot embers from the fireplace. In some cases, you may even find a second life of defense surrounding the chimney cap, such as wiring or grating.
Chimney Flashing
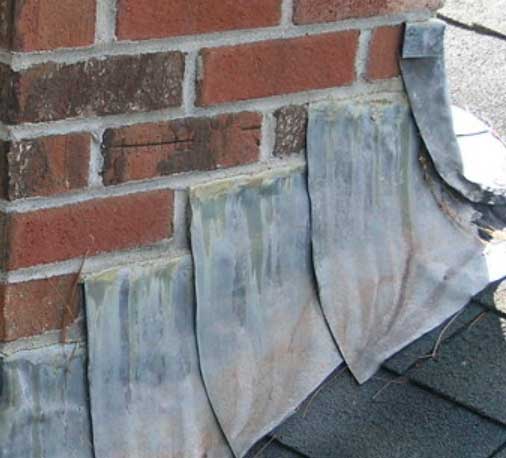
The protective coat found where the base of your chimney touches your roof is known as the chimney flashing. The purpose of this part of your chimney is to prevent moisture from entering your home, especially your attic.
Chimney Interior
Unlike most problems with the exterior of your chimney, problems with the interior of your chimney can happen quickly and unexpectedly. Thus, they require immediate attention.
Chimney Flue
The tube structure through which your fireplace smoke will exit your home is known as the chimney flue.
Chimney Flue Liner
Inside your chimney flue, there is a liner covering the interior. This liner is known as the chimney flue liner, as you could have guessed. The purpose of this liner is to make it easier for smoke to exit through the flue. Additionally, the chimney flue is there to protect your house and prevent fires due to the hot smoke produced by your fireplace. Without a liner, your chimney could be a real danger. Chimneys without liners pose multiple threats, including fire hazards, and toxic gases filling the air of your home.
Throat Damper
The throat damper is used to moderate the flow of air that enters and exits your chimney. When you are not using your fireplace, the throat damper should be closed. Otherwise, cold air will easily enter your home. Contrarily, you must always open the throat damper when making use of your fireplace to allow smoke to exit your chimney. Without doing this, using your fireplace can be dangerous.
Firebox
As some may know, the part of your fireplace where you burn wood and where your fire is located is known as the firebox. Usually, masonry fireplaces have fireboxes made of brick.
Smoke Shelf or Smoke Chamber
The area between the chimney’s flue and your firebox is called the smoke chamber. This is the part of your chimney where the smoke and combustible material are compressed to exit the flue without allowing a backdraft.
It is important to clean and inspect your smoke chamber regularly, as this is where soot and creosote gather.
Chimney Inspection
Although it is possible to inspect your chimney yourself, it is recommended to hire a professional to do this as they will have more experience and know exactly what to look for. You should hire a professional once per year for an inspection.
Expert chimney inspectors have all the required equipment, including video cameras that will help them detect any current or future problems you may face with your chimney. They will also be able to find problems that the average homeowner would not notice.
Signs Of Damaged Chimneys: How to Fix Them
While chimney damage is obvious in some situations, this is not always the case. Often, chimney damage can be hard to notice. Nevertheless, you must detect these problems early before the problem is beyond repairable.
Efflorescence
Often, you will notice white stains on chimneys. This is known as efflorescence, which means “flowering”. Thankfully, this stain is not a problem on its own as it can be easily removed. However, efflorescence signifies that your chimney has a moisture problem, and this should be resolved as soon as possible to prevent damage in the future.
When efflorescence is present, this means that there is moisture escaping your chimney flue through your brick. When moisture exits the chimney this way, it dissolves salts found in the mortar which then pushes them to the exterior, hence the white coloring that can be seen. Your chimney will deteriorate if this problem is not quickly addressed. You can follow these steps to resolve this problem:
Removing Efflorescence
There are a few common ways to remove such stains, here they are:
- Power Washing
- Power washing is excellent for cleaning the surface of your brick and removing the stains. However, it is important to keep the pressure under 1200 psi. Otherwise, you risk damaging the bricks surrounding your chimney.
- Sandblasting
- This method can also be very helpful, as long as you know what amount of pressure to apply when sandblasting. Applying too much pressure can work against you and in fact, make your brick more at risk of efflorescence. You can avoid this by applying a sealant when you are doing sandblasting.
- Chemicals
- If you find that the previous two methods are not removing the stains, you will need to use chemicals. You can find a large variety of approved commercial cleaning agents available on the market. Additionally, using vinegar, tartaric acid, citric acid or other organic acids can do the job, without spending much money.
Remove the Stains Cost
Depending on the method you choose to remove the stains, the price will vary. If you choose the sandblasting method, you should be prepared to pay between $35 and $95 per hour (excluding material costs), while you will likely have to pay between 25 and 45 cents per square foot of power washing. These rates are for homeowners who will hire a contractor to do the job for them.
Melted or Cracked Crown
The first line of defense when it comes to fighting external elements is the crown. A faulty crown (cracked or melted) will allow moisture to seep in and destroy the mortar, all while widening the cracks between bricks.
Fixing a Melted or Cracked Crown
For less severe damage, it is possible to simply fill the cracks using a properly mixed mortar (must be thin). After filling the cracks, you should smoothen the mortar. To do this, use a thin piece of wood and press it against the wet mortar until flat and smooth.
Alternatively, you may choose to caulk up the cracks. Before beginning, you should remove any mortar that may be loose or crumbling. Once done, you can apply the caulk to the cracks and use a thin stiff brush to then flatten and smooth the mortar. You must insert the caulk far in the cracks to ensure that the cracks are filled, even far inside. Once done caulking, using a brush or wet rag, you can wipe the remaining mortar.
Regardless of which method you use, it is important to finish the job by applying a waterproof elastomeric coating.
Cost of Cracks Repair
Thankfully, small cracks are rather inexpensive to repair. Such cracks should only cost around $250 to repair. For larger cracks that require replacing the bricks, you should be prepared to pay upwards of $650, and maybe even up to $1200.
Spalling Bricks
When moisture gets to the masonry or bricks of your chimney, your chimney will likely become less stable or begin to crumble. This is called spalling. In colder temperatures, spalling will spread more easily as moisture will widen the cracks when it freezes and expands. Spalling requires immediate attention.
You should start by addressing the source of the problem, which in this case, is moisture. You should then determine how the moisture is getting in by inspecting your flue and the masonry. Once you can determine the source of the problem, you should begin treating it.
Minor Spalling
Spalling, in its early stage, often involves minor small-medium cracks in the mortar or bricks. When the cracks are small enough, they can usually be fixed by simply applying a waterproof sealant to protect them.
Severe Spalling
If the spalling is quite severe and has been present for a while, chances are you will notice a severe deterioration of the bricks around your chimney. In such cases, you will need extra treatment. More precisely, replacing the bricks and mortar joints will be necessary.
For the most extreme cases, where the structure of your chimney is severely compromised, the only viable option may be to replace your chimney. You can either rebuild the chimney or install a new one. To ensure that the fresh masonry is reinforced, during rebuilding, the contractor should apply a waterproofing sealant that will help reinforce the fresh masonry. Installing a new chimney cap is often needed.
Cost
As with most repairs, the cost of your repair will depend on the severity of the issues. Resolving minor problems will undoubtedly cost you less. For early-stage problems, contractors tend to charge between $950 and $1250. For spalling that requires more attention, the price can be rather high, often exceeding $3200.
Should you opt to repair your chimney yourself, the materials should cost between $320 and $450, usually.
Deteriorating Mortar Joints
The exterior bricks of your chimney are held together by mortar joints. With cracked mortar joints, moisture can easily enter your chimney, resulting in even more damage. It is important to repair any cracks as soon as they are noticed.
Fixing Deteriorating Mortar Joints
Repairing mortar joints consists of two processes. The first process is known as tuck point or repoints, the process in which you must remove the crumbling mortar. The second step is to apply fresh mortar in the cracks.
Both processes must be completed with significant precision. You must remove precisely ¾ inches of the old mortar to begin. If you handle the job yourself, you should read the mortar package to ensure that you chose mortar designed for tuckpointing.
Deteriorating Mortar Joints Cost
As you can imagine, repairing smaller cracks will cost significantly less than repairing severe damage. For minor cracks, you should expect to pay between $160 and $270 to repair them. With more severely deteriorated mortar joints, you may need to replace the entire chimney facade and sidings, which will inevitably cost you more. Precisely, such repairs tend to cost upwards of $3100. As this task requires lots of labor, you can reduce the total cost of the repair by 75% by handling the project yourself as opposed to hiring a contractor.
Maintaining and Repairing Chimney Interior
We will now look into certain problems to keep an eye out for on the inside of your chimney.
Shaling Clay Flue Liner Tiles
One of the most common signs that your flue liner is cracked and shedding material is being able to see small parts of your chimney tile inside your fireplace. As mentioned previously in this article, your chimney flue helps avoid contact between hot air and combustible areas of your house. As a result, a faulty flue liner can be an extreme danger hazard as it can spark a fire. Not only large cracks can be dangerous, but also small ones, thus, you must repair them quickly to prevent carbon monoxide and creosote from entering your home. Additionally, cracked flue liners can result in an efflorescence problem, as you learned above.
Inspecting the Clay Flue Liner Tiles
If your roof is sturdy and on an angle that permits you to stand on your roof without danger, you can inspect the upper portion of your chimney. While inspecting your chimney, ensure that you closely review the clay tiles for damage using a flashlight.
Although you won’t be able to reach tiles that are further down your chimney, inspecting the few tiles closer to the top can be beneficial. Issues with your tiles often start with the ones closest to the top, which you should not have a problem inspecting. The reason for this is rather evident. Tiles closer to the top of your chimney are more exposed to moisture and combustion as they are tiles in the area where heat meets the cold air outside.
To begin, you should inspect the mortar found between each tile section, and take note of any missing or cracked mortar. Next, you should check for any kind of cracking in the tiles themselves. Thirdly, you should inspect the tiles for shaling. If you notice that the tiles have a rough texture, this is a sign of shaling. Proper tiles should be smooth and flat, not textured.
Repairing Shaling Clay Flue Liner Tiles
Fixing your flue yourself can be possible as long as the damage is minor. You can use a sealant to fill the flue liner cracks, however, it is important to note that this is not a permanent solution as sealing is only temporary and your flue liner will likely crack again in the future.
In cases of extreme damage or cracking, or if shaling is present further down your chimney, it is not recommended to handle the project yourself. Instead, speak with a trusted contractor able to do the job. Replacing the entire flue liner is often the best solution when severe damage is present.
For optimal durability, many homeowners are opting for stainless-steel chimney flue liners. These liners often come with a lifetime warranty, ensuring you don’t need to buy a new flue liner ever again. Both rigid and flexible liners are available on the market. We recommend flexible liners due to their ability to expand and contract much more easily than rigid lines. Additionally, flexible lines are less at risk of being clogged by buildup.
You may also choose to replace your flue liner using the cast-in-place method. As this process requires specific equipment and expertise, it is better left to a professional that can create a custom-fit liner for your chimney.
The cast-in-place method consists of inserting an inflatable mold in your chimney, placing a separator between the original flue liner and the bladder, then inflating the bladder, followed by filling that space with cement. After allowing the cement to dry, the bladder is carefully removed, leaving your new flue liner in place.
Repairing Shaling Clay Flue Liner Tiles Cost
As usual, the severity of the problem you wish to fix will play an important factor in determining the cost of your repair. The material used to complete the project will also cause your project cost to vary. On average, you can expect to pay between $55 and $85 per foot of stainless steel liner, but you should prepare to pay an additional $34 to $44 for labor and installation per foot of material.
Creosote Buildup
Smoke is unburned fuel, and it contains solids. Usually, most of the most created by a fire will be successfully vented, however, some will fall back down. The solids found in smoke can form highly flammable creosote when it builds up in the chimney flue.The most common chimney fire source is creosote catching fire.
Removing Creosote Buildup
Creosote removal should be an annual process. Depending on how much buildup your chimney has accumulated, you will require different treatments. The process of applying a liquid spray or a powder made to remove creosote is known as chemical treatment and is the most common way to remove creosote buildup. These substances should be applied to the fire or firewood. When burning wood covered in such chemicals, the smoke will carry particles of the chemical and settle on the creosote, then transforming it into harmless ash. Once the creosote has been converted to ash, you can simply remove the ash using a chimney sweep brush.
Removing Creosote Buildup Cost
The type and condition of a chimney will affect the cost of a chimney sweep. On average, chimney sweeps can cost as little as $145, or up to $370. However, homeowners should be prepared to pay more for creosote removal as this process involves using chemicals and equipment designed specifically for such tasks, as well as requiring more time and labor. You can also find logs that are made to loosen creosote, known as creosote logs, however, there is some doubt regarding the effectiveness of such logs when dealing with heavy creosote.
Rested Firebox or Throat Damper
Dampers become difficult, or in some cases even impossible to open when they accumulate a large amount of rust, thus, resulting in safety risks. You can often remove rust simply by applying pressure and scrubbing the rusty surface with a wire brush. Do note that before tackling this task, you should put on gloves, a hat, and goggles as rust are toxic.
Costs
On average, contractors charge somewhere between $220 and $380 to clean your firebox or throat damper. Depending on whether or not the mortar needs to be removed to complete the job, the project may cost you more as this requires more labor.